Maven Eclipse Plugin
Maven can be used to work with the Eclipse IDE. While direct integration is currently underway (thanks to Sonyatype) we are documenting the traditional approach here for reference. Creating .project and .classpath files
You can use Maven to set up the files needed for eclipse:
mvn eclipse:eclipse
This will produce the following files for each module:
.classpath file
.project file
The way to read the above line is we are using the eclipse plugin, and we are asking it to do the goal eclipse. The
-Dallswitch is used to include the unsupported modules.You can then import all the GeoTools projects into your Eclipse IDE.
Navigate to
From the Import dialog navigate to
Select your
geotoolscheckout directory, the modules (with generated .project files) will be listed allowing you to import them all.It will take a moment to compile the first time.
Note: Because Maven and Eclipse will both use target/classes you will need to perform a clean when switching between Maven and Eclipse for building.
You will need to run mvn eclipse:eclipse again if any dependencies change.
Note
If you would like maven command line and eclipse IDE to use different output directories:
mvn eclipse:eclipse -DoutputDirectory=bin
The other options are to specify a default output directory (so that eclipse and maven do not both use target/classes and trip on each other).
Customizing the Name of the Generated Projects
You can customize the generated project names a little bit (useful you have an existing project like GeoServer with its own “main” project):
mvn eclipse:eclipse -Declipse.projectNameTemplate="[groupId].[artifactId]"
An alternative approach could be:
mvn eclipse:eclipse -Declipse.projectNameTemplate="gt2-trunk-[artifactId]"
For more information see the Maven eclipse plugin documentation.
Working With Many Projects
After you have imported the above files you may notice something - there are a lot of projects.
For better performance in your IDE you can the open projects to those you are working on:
Close all the eclipse projects (just “close” them don’t delete them)
Then pick the module you’re interested in, and open it. It will ask you if you’d like to open dependent projects, and you should say “yes”.
Then go to the eclipse package manager “filters” setting (little “v” in the upper right) and choose to “hide closed projects”.
Now you’re looking at about 6-8 GeoTools projects that are easily eclipse buildable (all dependencies on SNAPSHOTS and what-not are handled by eclipse:eclipse) fairly small and well cross-referenced.
Creating .project and .classpath files with source code
In addition to downloading jars, Maven can also download the associated source code. As source code is often much larger you are warned: 1. Generate with source code (THIS MAY TAKE TWO HOURS):
mvn eclipse:eclipse -DdownloadSources=true
Downloading the source code will make sure eclipse has enough information to display javadocs. When coding the correct argument names will be displayed.
Cleaning up the .project and .classpath files
To remove generated .project and .classpath files:
mvn eclipse:clean
The way to read the above line is we are using the eclipse plugin, and we are asking it to do the goal clean.
Tips and Tricks for working with Eclipse
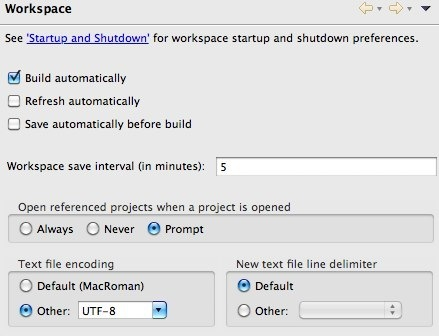
The GeoTools codebase uses “UTF-8” - so you will need to tell eclipse about it. Under workspace preferences you can change the Text file encoding by selecting Other and choosing UTF-8 from the list.

GeoTools has defined templates you can import:
build/eclipse/codetemplates.xml