Netbeans Quickstart
Welcome NetBeans Developers
Welcome to Geospatial for Java. This workbook is aimed at Java developers who are new to geospatial and would like to get started.
We are going to start out carefully with the steps needed to set up your Netbeans IDE. This workbook is also available for Eclipse or Maven command line use. The build tool Maven (http://maven.apache.org/) is our preferred option for downloading and managing jars. GeoTools projects tend to use a large number of jars and an automated solution is preferable.
If you are already familiar with Maven that is an advantage but if not, don’t worry, we will be explaining things step by step and we will also document how to set up things by hand as an alternative to using Maven.
These are visual tutorials that allows you to see what you are working with while you learn. These examples make use of Swing; be assured that this is only to make the examples easy and fun to use. These sessions are applicable to both server side and client side development.
We would like thank members of the GeoTools users list for their feedback while were preparing the course material, with special thanks to Tom Williamson for reviewing early drafts.
Java Install
We are going to be making use of Java so if you don’t have a Java Development Kit installed now is the time to do so. Even if you have Java installed already check out the optional Java Advanced Imaging and Java Image IO section – both of these libraries are used by GeoTools.
Download the latest JDK from the java.sun.com website:
At the time of writing the latest JDK was:
OpenJDK11U-jdk_x64_windows_hotspot_11.0.17_8.msiClick through the installer you will need to set an acceptance a license agreement and so forth. By default this will install to:
C:\\Program Files\\Eclipse Adoptium\\jdk-11.0.17.8-hotspot
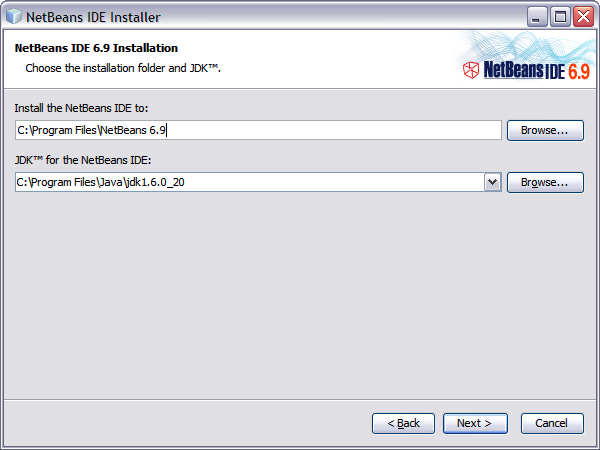
NetBeans Install
The NetBeans IDE is a popular choice for Java development and features excellent Maven integration.
Download NetBeans (The Java SE download will be fine).
At the time of
netbeans-7.0.1-ml-javase-windows.exewas the latest installer.Click through the steps of the installer. You will notice it will pick up on the JDK you installed earlier.
Quickstart
The GeoTools development community uses the build tool Maven which is integrated into the latest releases of NetBeans.
The advantages of using Maven are:
You only download as much of GeoTools as your application requires
Jars are downloaded to a single location in your home directory (in a hidden folder called
.m2/repository)Source code and javadocs are automatically downloaded and hooked up
Although Maven is a build tool it works by describing the contents of a project. This is a different approach then used by the Make or Ant tools which list the steps required to build.
The description of a project includes the required jars (called dependencies) and a repository on the internet where the jars can be downloaded. We will be using these facilities to bring GeoTools jars into our project as needed.
Creating the Project
Let’s get started:
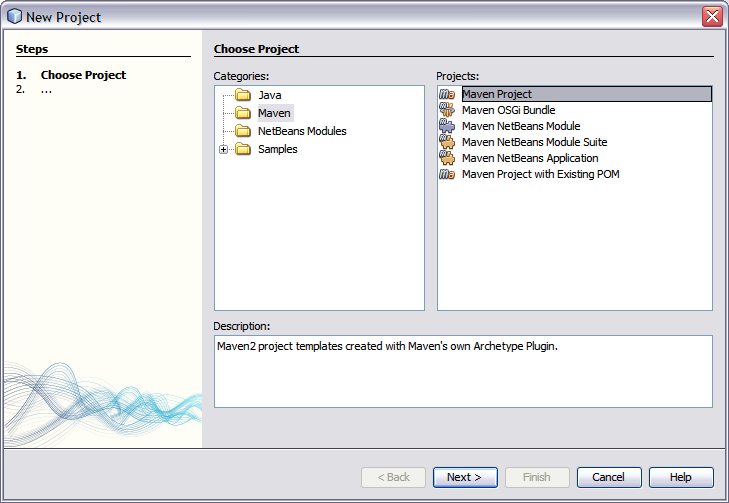
Start with to open the New Project wizard
Select the Maven category; choose Maven Project and press Next.
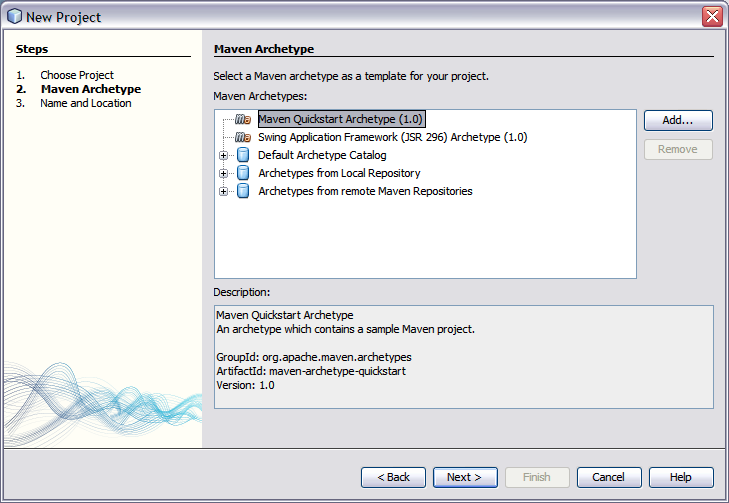
On the Maven Archetype page select “Maven Quickstart Archetype” and press Next.
We can now fill in the blanks
Project name:
tutorialGroupId:
org.geotools
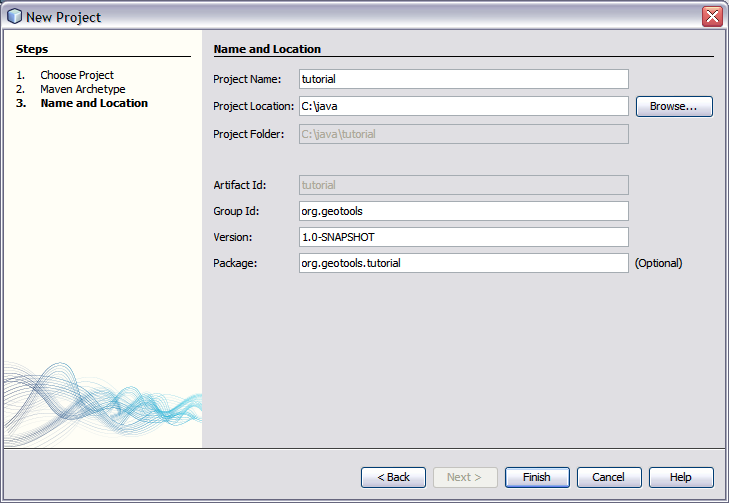
Click on the Finish button and the new project will be created.
If this is your first time using Maven with NetBeans it will want to confirm that it is okay to use the copy of Maven included with NetBeans (it is also possible to use an external Maven executable from within Netbeans which is convenient if, for instance, you want to work with the same version of Maven within the IDE and from the command line).
Adding Jars to Your Project
The pom.xml file is used to describe the care and feeding of your maven project; we are going to
focus on the dependencies needed for your project
When downloading jars maven makes use of a “local repository” to store jars.
PLATFORM
LOCAL REPOSITORY
Windows XP:
C:\Documents and Settings\You\.m2\repositoryWindows:
C:\Users\You\.m2\repositoryLinux and Mac:
~/.m2/repository
When downloading jars maven makes use of public maven repositories on the internet where projects such as GeoTools publish their work.
The next step is for us to make it a GeoTools project by adding information to Maven’s project description file (“project object model” in Maven-speak) -
pom.xmlIn the Projects panel open up the Project Files folder and double click on
pom.xmlto open it.We are going to start by defining the version number of GeoTools we wish to use. This workbook was written for 34.0 although you may wish to try a different version.
For production a stable release of 36 should be used for geotools.version:
  <properties>
    <project.build.sourceEncoding>UTF-8</project.build.sourceEncoding>
    <maven.compiler.release>17</maven.compiler.release>
    <gt.version>36-SNAPSHOT</gt.version>
    <maven.deploy.skip>true</maven.deploy.skip>
  </properties>
To make use of a nightly build set the geotools.version property to 36-SNAPSHOT .
If you make any mistakes when editing the xml file you’ll see that your project will be renamed “<Badly formed Maven project>” in the Projects window. You can choose “Format” as a quick way to check if the tags line up. Or just hit undo and try again.
We use the GeoTools Bill of Materials (BOM) to manage dependency versions. This ensures that all GeoTools modules use compatible versions:
  <dependencyManagement>
    <dependencies>
      <!-- Import the GeoTools BOM -->
      <dependency>
        <groupId>org.geotools</groupId>
        <artifactId>gt-bom</artifactId>
        <version>${gt.version}</version>
        <type>pom</type>
        <scope>import</scope>
      </dependency>
      <dependency>
        <groupId>org.junit</groupId>
        <artifactId>junit-bom</artifactId>
        <version>5.14.4</version>
        <type>pom</type>
        <scope>import</scope>
      </dependency>
    </dependencies>
  </dependencyManagement>
The BOM (Bill of Materials) pattern centralizes version management. By importing the
gt-bom, we don’t need to specify version numbers for individual GeoTools modules.Next we add two GeoTools modules to the dependencies section:
gt-shapefileandgt-swing. Note that we don’t specify version numbers since these are managed by the BOM:<dependencies> <dependency> <groupId>org.geotools</groupId> <artifactId>gt-shapefile</artifactId> </dependency> <dependency> <groupId>org.geotools</groupId> <artifactId>gt-swing</artifactId> </dependency> <dependency> <groupId>org.junit.jupiter</groupId> <artifactId>junit-jupiter-api</artifactId> <scope>test</scope> </dependency> </dependencies>
And the repositories where these jars can be downloaded from:
  <repositories>
    <repository>
      <id>osgeo</id>
      <name>OSGeo Release Repository</name>
      <url>https://repo.osgeo.org/repository/release/</url>
      <snapshots><enabled>false</enabled></snapshots>
      <releases><enabled>true</enabled></releases>
    </repository>
    <repository>
      <id>osgeo-snapshot</id>
      <name>OSGeo Snapshot Repository</name>
      <url>https://repo.osgeo.org/repository/snapshot/</url>
      <snapshots><enabled>true</enabled></snapshots>
      <releases><enabled>false</enabled></releases>
    </repository>
  </repositories>
Note
Note the snapshot repository above is only required if you are using a nightly build (such as 36-SNAPSHOT)
GeoTools requires Java 17, you need to tell Maven to use the 17 source level
  <build>
    <pluginManagement><!-- lock down plugins versions to avoid using Maven defaults (may be moved to parent pom) -->
      <plugins>
        <!-- clean lifecycle, see https://maven.apache.org/ref/current/maven-core/lifecycles.html#clean_Lifecycle -->
        <plugin>
          <artifactId>maven-clean-plugin</artifactId>
          <version>3.4.0</version>
        </plugin>
        <!-- default lifecycle, jar packaging: see https://maven.apache.org/ref/current/maven-core/default-bindings.html#Plugin_bindings_for_jar_packaging -->
        <plugin>
          <artifactId>maven-resources-plugin</artifactId>
          <version>3.3.1</version>
        </plugin>
        <plugin>
          <artifactId>maven-compiler-plugin</artifactId>
          <version>3.13.0</version>
        </plugin>
        <plugin>
          <artifactId>maven-surefire-plugin</artifactId>
          <version>3.3.0</version>
        </plugin>
        <plugin>
          <artifactId>maven-jar-plugin</artifactId>
          <version>3.4.2</version>
        </plugin>
        <plugin>
          <artifactId>maven-install-plugin</artifactId>
          <version>3.1.2</version>
        </plugin>
        <plugin>
          <artifactId>maven-deploy-plugin</artifactId>
          <version>3.1.2</version>
        </plugin>
        <!-- site lifecycle, see https://maven.apache.org/ref/current/maven-core/lifecycles.html#site_Lifecycle -->
        <plugin>
          <artifactId>maven-site-plugin</artifactId>
          <version>3.12.1</version>
        </plugin>
        <plugin>
          <artifactId>maven-project-info-reports-plugin</artifactId>
          <version>3.6.1</version>
        </plugin>
      </plugins>
    </pluginManagement>
    <plugins>
      <plugin>
        <groupId>org.apache.maven.plugins</groupId>
        <artifactId>maven-compiler-plugin</artifactId>
        <configuration>
          <release>17</release>
        </configuration>
      </plugin>
    </plugins>
  </build>
You can now right click on Libraries in the Projects window, then Download missing Dependencies from the pop-up menu. When downloading it will check the repositories we have listed above.
We will continue to add dependencies on different parts of the GeoTools library as we work through these exercises; this fine grain control and the ability to download exactly what is needed is one of the advantages of using Maven.
Here is what the completed
pom.xmllooks like:<project xmlns="http://maven.apache.org/POM/4.0.0" xmlns:xsi="http://www.w3.org/2001/XMLSchema-instance" xsi:schemaLocation="http://maven.apache.org/POM/4.0.0 https://maven.apache.org/xsd/maven-4.0.0.xsd"> <modelVersion>4.0.0</modelVersion> <groupId>org.geotools.tutorial</groupId> <artifactId>quickstart</artifactId> <version>0.0.1-SNAPSHOT</version> <packaging>jar</packaging> <name>GeoTools Quickstart</name> <url>http://maven.apache.org</url> <properties> <project.build.sourceEncoding>UTF-8</project.build.sourceEncoding> <maven.compiler.release>17</maven.compiler.release> <gt.version>36-SNAPSHOT</gt.version> <maven.deploy.skip>true</maven.deploy.skip> </properties> <dependencyManagement> <dependencies> <!-- Import the GeoTools BOM --> <dependency> <groupId>org.geotools</groupId> <artifactId>gt-bom</artifactId> <version>${gt.version}</version> <type>pom</type> <scope>import</scope> </dependency> <dependency> <groupId>org.junit</groupId> <artifactId>junit-bom</artifactId> <version>5.14.4</version> <type>pom</type> <scope>import</scope> </dependency> </dependencies> </dependencyManagement> <dependencies> <dependency> <groupId>org.geotools</groupId> <artifactId>gt-shapefile</artifactId> </dependency> <dependency> <groupId>org.geotools</groupId> <artifactId>gt-swing</artifactId> </dependency> <dependency> <groupId>org.junit.jupiter</groupId> <artifactId>junit-jupiter-api</artifactId> <scope>test</scope> </dependency> </dependencies> <repositories> <repository> <id>osgeo</id> <name>OSGeo Release Repository</name> <url>https://repo.osgeo.org/repository/release/</url> <snapshots><enabled>false</enabled></snapshots> <releases><enabled>true</enabled></releases> </repository> <repository> <id>osgeo-snapshot</id> <name>OSGeo Snapshot Repository</name> <url>https://repo.osgeo.org/repository/snapshot/</url> <snapshots><enabled>true</enabled></snapshots> <releases><enabled>false</enabled></releases> </repository> </repositories> <build> <pluginManagement><!-- lock down plugins versions to avoid using Maven defaults (may be moved to parent pom) --> <plugins> <!-- clean lifecycle, see https://maven.apache.org/ref/current/maven-core/lifecycles.html#clean_Lifecycle --> <plugin> <artifactId>maven-clean-plugin</artifactId> <version>3.4.0</version> </plugin> <!-- default lifecycle, jar packaging: see https://maven.apache.org/ref/current/maven-core/default-bindings.html#Plugin_bindings_for_jar_packaging --> <plugin> <artifactId>maven-resources-plugin</artifactId> <version>3.3.1</version> </plugin> <plugin> <artifactId>maven-compiler-plugin</artifactId> <version>3.13.0</version> </plugin> <plugin> <artifactId>maven-surefire-plugin</artifactId> <version>3.3.0</version> </plugin> <plugin> <artifactId>maven-jar-plugin</artifactId> <version>3.4.2</version> </plugin> <plugin> <artifactId>maven-install-plugin</artifactId> <version>3.1.2</version> </plugin> <plugin> <artifactId>maven-deploy-plugin</artifactId> <version>3.1.2</version> </plugin> <!-- site lifecycle, see https://maven.apache.org/ref/current/maven-core/lifecycles.html#site_Lifecycle --> <plugin> <artifactId>maven-site-plugin</artifactId> <version>3.12.1</version> </plugin> <plugin> <artifactId>maven-project-info-reports-plugin</artifactId> <version>3.6.1</version> </plugin> </plugins> </pluginManagement> <plugins> <plugin> <groupId>org.apache.maven.plugins</groupId> <artifactId>maven-compiler-plugin</artifactId> <configuration> <release>17</release> </configuration> </plugin> </plugins> </build> <reporting> <plugins> <plugin> <groupId>org.apache.maven.plugins</groupId> <artifactId>maven-javadoc-plugin</artifactId> <version>3.11.2</version> <configuration> <release>17</release> <!-- Force non-modular mode for projects without module-info.java --> <legacyMode>true</legacyMode> <!-- Specifies whether or not the version text is included.--> <version>false</version> <!-- Omit qualifying package name before class names in output.--> <noqualifier>all</noqualifier> <!-- Shuts off non-error and non-warning messages.--> <quiet>true</quiet> <!-- The maximum Java heap size to be used to run javadoc. --> <maxmemory>${javadoc.maxHeapSize}</maxmemory> <!-- Specifies the encoding name of the source files.--> <encoding>UTF-8</encoding> <!-- Set an additional parameter for the command line. --> <additionalOptions>-keywords</additionalOptions> <breakiterator>true</breakiterator> <excludePackageNames>org.geotools.resources:org.geotools.maven:com:net.opengis:org.w3:javax:it.geosolutions</excludePackageNames> <!-- Enables the Javadoc tool to interpret a simple, one-argument --> <!-- custom block tag tagname in doc comments. Note: <placement/> --> <!-- should be a combination of the letters Xaoptcmf. --> <tags> <tag> <name>todo</name> <placement>a</placement> <head>TODO:</head> </tag> <tag> <name>todo:</name> <placement>a</placement> <head>TODO:</head> </tag> <tag> <name>TODO</name> <placement>a</placement> <head>TODO:</head> </tag> <tag> <name>task</name> <placement>tfmc</placement> <head>TODO:</head> </tag> <tag> <name>revisit</name> <placement>tfmc</placement> <head>TODO:</head> </tag> <tag> <name>generated</name> <placement>Xt</placement> <head>Generated</head> </tag> <tag> <name>UML</name> <placement>a</placement> <head>UML:</head> </tag> <tag> <name>uml.property</name> <placement>a</placement> <head>UML property:</head> </tag> <tag> <name>generated</name> <placement>X</placement> </tag> </tags> <!-- Creates links to existing javadoc-generated --> <!-- documentation of external referenced classes. --> <links> <link>https://docs.oracle.com/en/java/javase/17/docs/api/</link> <link>https://javaee.github.io/javaee-spec/javadocs/</link> <link>https://locationtech.github.io/jts/javadoc/</link> </links> </configuration> <!-- only works with package javadoc:aggregate for use of META-INF/MANIFEST.MF Automatic-Module-Name --> <reportSets> <reportSet> <id>aggregate</id> <reports> <report>aggregate</report> </reports> <inherited>false</inherited> </reportSet> <reportSet> <id>default</id> <reports> <report>javadoc</report> </reports> </reportSet> </reportSets> </plugin> </plugins> </reporting> </project>
Recommend cutting and pasting the above to avoid mistakes when typing
You may also download
pom.xml, if this opens in your browser use Save As to save to disk.The download has an optional quality assurance profile you can safely ignore.
Quickstart Application
Now that your environment is setup we can put together a simple Quickstart. This example will display a shapefile on screen.
Create the package
org.geotools.tutorial.quickstart.Create the
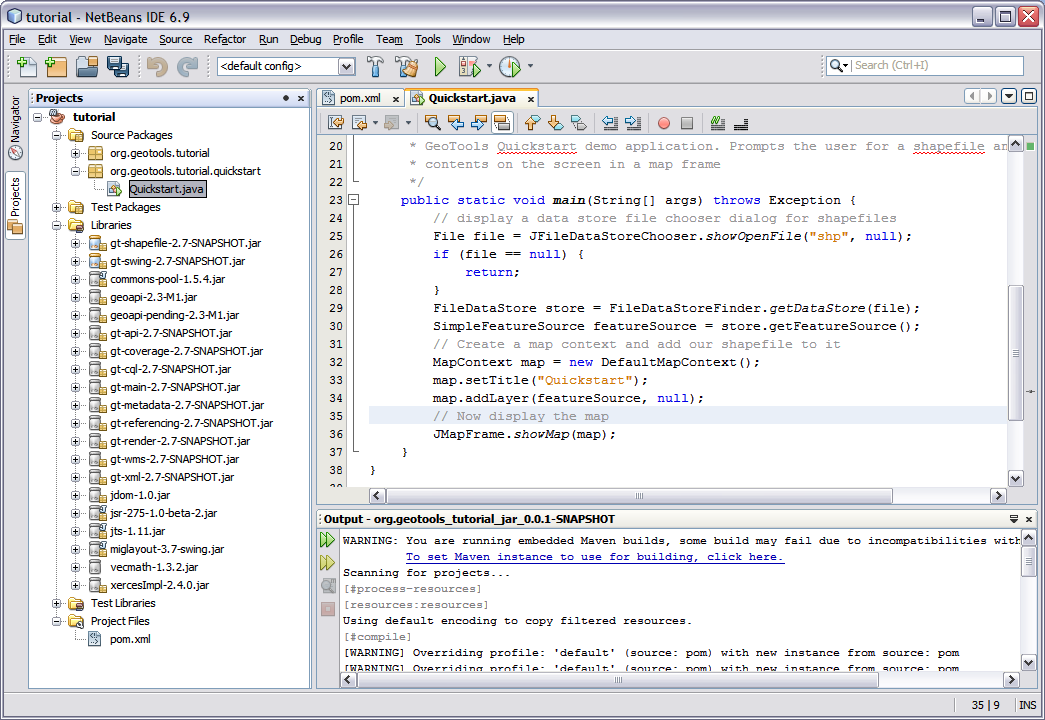
org.geotools.tutorial.quickstart.Quickstartclass using your IDE.Fill in the following code
Quickstart.java:/* * GeoTools Sample code and Tutorials by Open Source Geospatial Foundation, and others * https://docs.geotools.org * * To the extent possible under law, the author(s) have dedicated all copyright * and related and neighboring rights to this software to the public domain worldwide. * This software is distributed without any warranty. * * You should have received a copy of the CC0 Public Domain Dedication along with this * software. If not, see <http://creativecommons.org/publicdomain/zero/1.0/>. */ package org.geotools.tutorial.quickstart; import java.io.File; import java.util.logging.Logger; import org.geotools.api.data.FileDataStore; import org.geotools.api.data.FileDataStoreFinder; import org.geotools.api.data.SimpleFeatureSource; import org.geotools.map.FeatureLayer; import org.geotools.map.Layer; import org.geotools.map.MapContent; import org.geotools.styling.SLD; import org.geotools.api.style.Style; import org.geotools.swing.JMapFrame; import org.geotools.swing.data.JFileDataStoreChooser; /** * Prompts the user for a shapefile and displays the contents on the screen in a map frame. * * <p>This is the GeoTools Quickstart application used in documentationa and tutorials. * */ public class Quickstart { private static final Logger LOGGER = org.geotools.util.logging.Logging.getLogger(Quickstart.class); /** * GeoTools Quickstart demo application. Prompts the user for a shapefile and displays its * contents on the screen in a map frame * @param args Ignored no args required. * @throws Exception If there are errors finding the shapefile. */ public static void main(String[] args) throws Exception { // display a data store file chooser dialog for shapefiles LOGGER.info( "Quickstart"); LOGGER.config( "Welcome Developers"); LOGGER.info("java.util.logging.config.file="+System.getProperty("java.util.logging.config.file")); File file = JFileDataStoreChooser.showOpenFile("shp", null); if (file == null) { return; } LOGGER.config("File selected "+file); FileDataStore store = FileDataStoreFinder.getDataStore(file); SimpleFeatureSource featureSource = store.getFeatureSource(); // Create a map content and add our shapefile to it MapContent map = new MapContent(); map.setTitle("Quickstart"); Style style = SLD.createSimpleStyle(featureSource.getSchema()); Layer layer = new FeatureLayer(featureSource, style); map.addLayer(layer); // Now display the map JMapFrame.showMap(map); } }
You may find cutting and pasting from the documentation to be easier then typing.
You may also download
Quickstart.java
Build the application and check that all is well in the Output window.
A fair bit of time will be spent downloading the libraries required.
Running the Application
We need to download some sample data to work with. The http://www.naturalearthdata.com/ project is a great project supported by the North American Cartographic Information Society. Head to the link below and download some cultural vectors. You can use the ‘Download all 50m cultural themes’ at top.
Please unzip the above data into a location you can find easily such as the desktop.
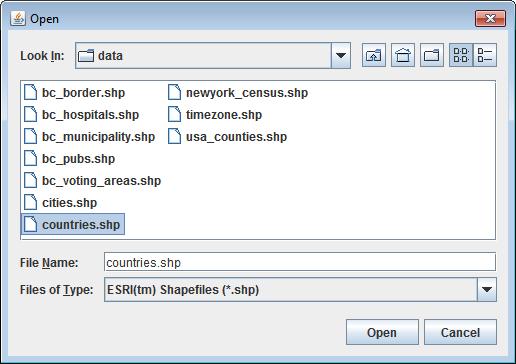
Run the application to open a file chooser. Choose a shapefile from the example data set.
The application will connect to your shapefile, 1.produce a map context and display the shapefile.

A couple of things to note about the code example:
The shapefile is not loaded into memory – instead it is read from disk each and every time it is needed This approach allows you to work with data sets larger then available memory.
We are using a very basic display style here that just shows feature outlines. In the examples that follow we will see how to specify more sophisticated styles.
Things to Try
Each tutorial consists of very detailed steps followed by a series of extra questions. If you get stuck at any point please ask your instructor; or sign up to the geotools-users email list.
Here are some additional challenges for you to try:
Try out the different sample data sets.
Zoom in, zoom out and show the full extent and use the info tool to examine individual countries in the sample
countries.shpfile.Download the largest shapefile you can find and see how quickly it can be rendered. You should find that the very first time it will take a while as a spatial index is generated. After that rendering will become much faster.
Fast: We know that one of the ways people select a spatial library is based on speed. By design GeoTools does not load the above shapefile into memory (instead it streams it off of disk each time it is drawn using a spatial index to only bring the content required for display).
If you would like to ask GeoTools to cache the shapefile in memory try the following code:
    /**
     * This method demonstrates using a memory-based cache to speed up the display (e.g. when
     * zooming in and out).
     *
     * <p>There is just one line extra compared to the main method, where we create an instance of
     * CachingFeatureStore.
     * @param args Ignored no args required.
     * @throws Exception If there are errors finding the shapefile.
     */
    public static void main(String[] args) throws Exception {
        // display a data store file chooser dialog for shapefiles
        File file = JFileDataStoreChooser.showOpenFile("shp", null);
        if (file == null) {
            return;
        }

        FileDataStore store = FileDataStoreFinder.getDataStore(file);
        SimpleFeatureSource featureSource = store.getFeatureSource();
        SimpleFeatureSource cachedSource =
                DataUtilities.source(
                        new SpatialIndexFeatureCollection(featureSource.getFeatures()));

        // Create a map content and add our shapefile to it
        MapContent map = new MapContent();
        map.setTitle("Using cached features");
        Style style = SLD.createSimpleStyle(featureSource.getSchema());
        Layer layer = new FeatureLayer(cachedSource, style);
        map.addLayer(layer);

        // Now display the map
        JMapFrame.showMap(map);
    }
For the above example to compile you will need to add the necessary imports.
Note
When building you may see a message that
CachingFeatureSourceis deprecated. It’s OK to ignore it, it’s just a warning. The class is still under test but usable.
Try and sort out what all the different “side car” files are – and what they are for. The sample data set includes
shp,dbfandshx. How many other side car files are there?Advanced: The use of
FileDataStoreFinderallows us to work easily with files. The other way to do things is with a map of connection parameters. This techniques gives us a little more control over how we work with a shapefile and also allows us to connect to databases and web feature servers.File file = JFileDataStoreChooser.showOpenFile("shp", null); Map<String, Object> params = new HashMap<>(); params.put("url", file.toURI().toURL()); params.put("create spatial index", false); params.put("memory mapped buffer", false); params.put("charset", "ISO-8859-1"); DataStore store = DataStoreFinder.getDataStore(params); SimpleFeatureSource featureSource = store.getFeatureSource(store.getTypeNames()[0]);
Important: GeoTools is an active open source project – you can quickly use maven to try out the latest nightly build by changing your
pom.xmlfile to use aSNAPSHOTrelease.At the time of writing 36.x-SNAPSHOT is under active development.
<properties>
  <project.build.sourceEncoding>UTF-8</project.build.sourceEncoding>
  <geotools.version>36.x-SNAPSHOT</geotools.version>
</properties>
Double check your
pom.xmlfile to include the OSGeo snapshot repository:<repositories> <repository> <id>osgeo</id> <name>OSGeo Release Repository</name> <url>https://repo.osgeo.org/repository/release/</url> <snapshots><enabled>false</enabled></snapshots> <releases><enabled>true</enabled></releases> </repository> <repository> <id>osgeo-snapshot</id> <name>OSGeo Snapshot Repository</name> <url>https://repo.osgeo.org/repository/snapshot/</url> <snapshots><enabled>true</enabled></snapshots> <releases><enabled>false</enabled></releases> </repository> </repositories>
You can check the status of the build server producing current 36.x-SNAPSHOT here:
NetBeans has an interesting feature to show how the dependency system works - Right click on Libraries and choose Show Dependency
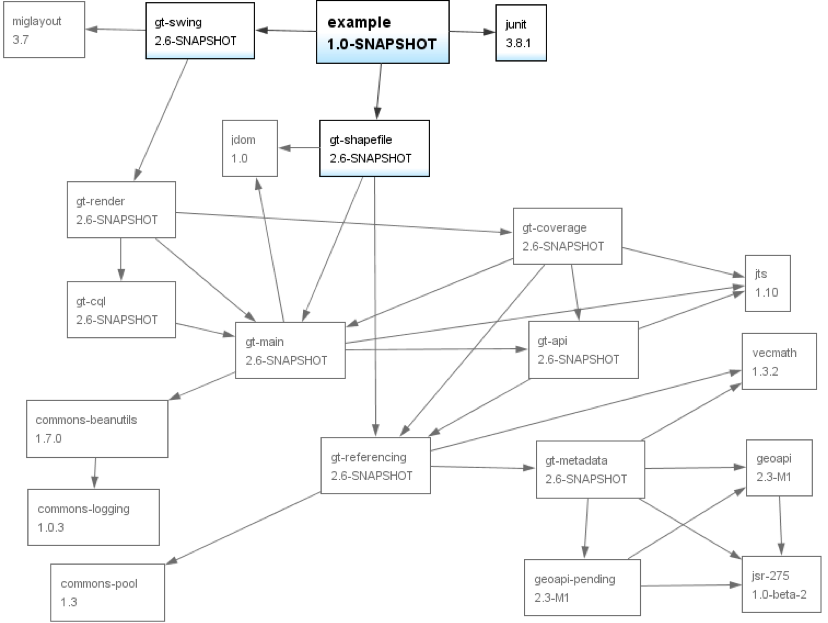
We will be making use of some of the project is greater depth in the remaining tutorials.
Maven Alternative
The alternative to using Maven to download and manage jars for you is to manually install them. To start with we will obtain GeoTools from the website:
Download the GeoTools binary release from http://sourceforge.net/projects/geotools/files
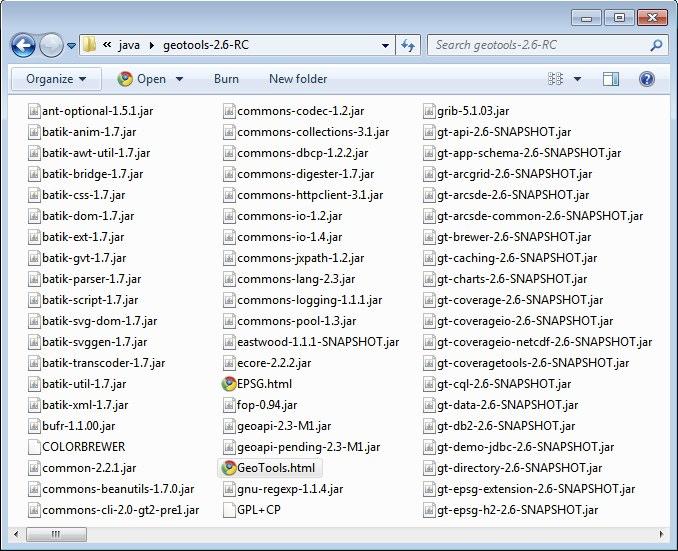
Extract the
geotools-2.6.0-bin.zipfile toC:\java\geotools-2.6.0folder.If you open up the folder and have a look you will see GeoTools and all of the other jars that it uses including those from other libraries such as GeoAPI and JTS.
We can now set up GeoTools as a library in NetBeans:
From the menu bar choose Tools > Libraries to open the Library Manager.
From the Library Manager press the New Library button.
Enter “GeoTools” for the Library Name and press OK
You can now press the Add JAR/Folder button and add in all the jars from C:\java\GeoTools-34.0
GeoTools includes a copy of the “EPSG” map projections database; but also allows you to hook up your own copy of the EPSG database as an option. However, only one copy can be used at a time so we will need to remove the following jars from the Library Manager:
GeoTools allows you to work with many different databases; however to make them work you will need to download jdbc drivers from the manufacturer.
For now remove the following plugins from the Library Manager:
gt-db2gt-jdbc-db2gt-oracle-spatialgt-jdbc-oracle
We are now ready to proceed with creating an example project. Select
Choose the default “Java Application”
Fill in “Tutorial” as the project name; and our initial Main class will be called “Quickstart”.
Open up Example in the Projects window, right click on Libraries and select Add Libraries. Choose GeoTools from the Add Library dialog.
Congratulations ! You can now return to Quickstart or any of the other tutorials