Maven Quickstart
Welcome
This tutorial is for those who prefer the pleasant company of a text editor and a trusty command prompt. Even if you routinely use an IDE, you will find that it’s often quicker and easier to compile, test and install your applications from the command line. We’ll be using Maven (http://maven.apache.org/) to manage the large number of jars that a GeoTools projects depend on. Don’t worry if you’re not familiar with Maven because we will explain everything step by step.
The example application is the same one used for the NetBeans and Eclipse Quickstart tutorials: a simple program to load and display a shapefile.
We would like thank members of the GeoTools User mailing list for their feedback while we were preparing the course material, with special thanks to Eva Shon for testing/reviewing early drafts. If you have any questions or comments about this tutorial, please post them to the user list.
Java Install
We are going to be making use of Java so if you don’t have a Java Development Kit (JDK) installed now is the time to do so.
Java 17 Development Environment required:
Recommended: Download Java 17 Java Development Kit (JDK) from the Adoptium website:
https://adoptium.net/en-GB/temurin/releases?version=17&os=any&arch=any
Recommended: SDKMan is recommend on Linux and MacOS (and Windows WSL) to manage your Java Development environment:
sdk install java 17.0.16-tem
sdk use java 17.0.16-tem
Alternate: You may also be in position to use Java 17 from your operating system package manager.
At the time of writing Java 17 is the minimum required version.
Apache Maven
Maven is a widely-used build tool which works by describing the contents of a project. This is a different approach than that used by the Make or Ant tools which list the steps required to build.
It takes a while to get used to Maven and, but it definitely makes working with GeoTools much easier:
You only download as much of GeoTools as your application requires.
Jars are downloaded into a single location in your home directory:
C:\Documents and Settings\<user>\.m2\repository~/.m2/repository
This is your local repository.
The correct versions of all of the third-party jars required by GeoTools will be downloaded for you. This helps you to avoid obscure errors than can be caused by mismatched dependencies which can be very difficult to track down.
The single local repository makes it easier to work on other multiple open source projects.
GeoTools provides a Bill of Materials (BOM) that manages dependency versions automatically, ensuring all GeoTools modules and their transitive dependencies work together correctly.
Installing Maven
In this tutorial we refer to Maven version 3.8.6.
Recomended: Use SDKMan to manage build environment.
sdk install maven 3.8.6
Alternative: Download Maven from https://maven.apache.org
Unzip the file
apache-maven-3.8.6-bin.zipSet the environment variable
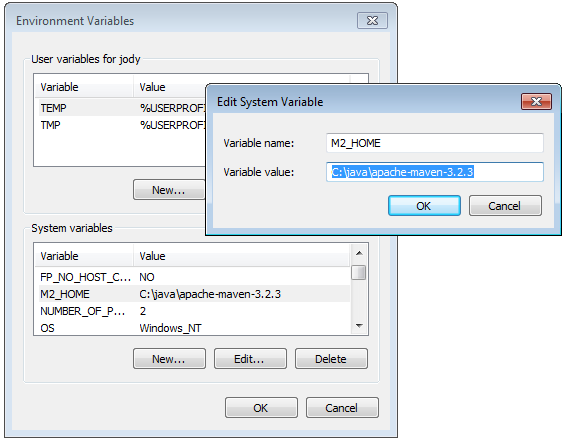
MAVEN_HOMEto point to the directory where you unzipped Maven.Windows: Navigate to . Change to the Advanced tab and click Environmental Variables button.
JAVA_HOME =
C:\Program Files\Eclipse Adoptium\jdk-17.0.8.7-hotspotMAVEN_HOME =
C:\java\apache-maven-3.8.6
And add the following to your PATH:
PATH =
%JAVA_HOME%\bin;%MAVEN_HOME%\bin
From a terminal or command prompt () Type the following command to confirm you are set up correctly:
mvn --version
This should produce something similar to the following output:
Apache Maven 3.8.6 (84538c9988a25aec085021c365c560670ad80f63)
Maven home: C:\devel\apache-maven-3.8.6
Java version: 11.0.17, vendor: Eclipse Adoptium, runtime: C:\Program Files\Eclipse Adoptium\jdk-17.0.8.7-hotspot
Default locale: it_IT, platform encoding: Cp1252
OS name: "windows 10", version: "10.0", arch: "amd64", family: "windows"

Creating a new project
We can now generate our project from maven-archetype-quickstart with:
C:>cd C:\java
C:java>  mvn archetype:generate -DgroupId=org.geotools -DartifactId=tutorial -Dversion=1.0-SNAPSHOT -DarchetypeGroupId=org.apache.maven.archetypes -DarchetypeArtifactId=maven-archetype-quickstart
The above command creates the following files and directories:
tutorial
tutorial\pom.xml
tutorial\src
tutorial\src\main
tutorial\src\main\java
tutorial\src\main\java\org
tutorial\src\main\java\org\geotools
tutorial\src\main\java\org\geotools\App.java
tutorial\src\test
tutorial\src\test\java
tutorial\src\test\java\org
tutorial\src\test\java\org\geotools
tutorial\src\test\java\org\geotools\AppTest.java
App.javaandAppTest.javaare just placeholder files not used in this tutorial.During the build process your local maven repository will be used to store both downloaded jars, and those you build locally.
Your local Maven repository is located in your home folder.
PLATFORM
LOCAL REPOSITORY
Windows XP:
C:\Documents and Settings\You\.m2\repositoryWindows:
C:\Users\You\.m2\repositoryLinux and Mac:
~/.m2/repositoryOpen the
pom.xmlfile in your favorite text editor. If your editor has an XML syntax mode switch into that now because it will make it a lot easier to find errors such as mismatched brackets. Some editors, such as vim, will do this automatically on loading the file.We are going to start by defining the version number of GeoTools we wish to use. This workbook was written for 36-SNAPSHOT although you may wish to try a different version.
For GeoTools 36 release set the geotools.version property to 34.0.
<properties>
  <project.build.sourceEncoding>UTF-8</project.build.sourceEncoding>
  <maven.compiler.release>17</maven.compiler.release>
  <gt.version>34.0</gt.version>
  <maven.deploy.skip>true</maven.deploy.skip>
</properties>
For GeoTools 36.x nightly build geotools.version should be set to 36-SNAPSHOT:
<properties>
  <project.build.sourceEncoding>UTF-8</project.build.sourceEncoding>
  <maven.compiler.release>17</maven.compiler.release>
  <gt.version>36-SNAPSHOT</gt.version>
  <maven.deploy.skip>true</maven.deploy.skip>
</properties>
We use the GeoTools Bill of Materials (BOM) to manage dependency versions. This ensures that all GeoTools modules use compatible versions and simplifies dependency management:
  <dependencyManagement>
    <dependencies>
      <!-- Import the GeoTools BOM -->
      <dependency>
        <groupId>org.geotools</groupId>
        <artifactId>gt-bom</artifactId>
        <version>${gt.version}</version>
        <type>pom</type>
        <scope>import</scope>
      </dependency>
      <dependency>
        <groupId>org.junit</groupId>
        <artifactId>junit-bom</artifactId>
        <version>5.14.4</version>
        <type>pom</type>
        <scope>import</scope>
      </dependency>
    </dependencies>
  </dependencyManagement>
The BOM (Bill of Materials) pattern is a Maven best practice that centralizes version management. By importing the
gt-bom, we don’t need to specify version numbers for individual GeoTools modules.We specify the following dependencies (GeoTools modules which your application will need).
Note that we don’t specify version numbers since these are managed by the BOM:
  <dependencies>
    <dependency>
      <groupId>org.geotools</groupId>
      <artifactId>gt-shapefile</artifactId>
    </dependency>
    <dependency>
      <groupId>org.geotools</groupId>
      <artifactId>gt-swing</artifactId>
    </dependency>
    <dependency>
      <groupId>org.junit.jupiter</groupId>
      <artifactId>junit-jupiter-api</artifactId>
      <scope>test</scope>
    </dependency>
  </dependencies>
The BOM (Bill of Materials) pattern centralizes version management. By importing the
gt-bom, we don’t need to specify version numbers for individual GeoTools modules.We tell maven which repositories to download jars from:
  <repositories>
    <repository>
      <id>osgeo</id>
      <name>OSGeo Release Repository</name>
      <url>https://repo.osgeo.org/repository/release/</url>
      <snapshots><enabled>false</enabled></snapshots>
      <releases><enabled>true</enabled></releases>
    </repository>
    <repository>
      <id>osgeo-snapshot</id>
      <name>OSGeo Snapshot Repository</name>
      <url>https://repo.osgeo.org/repository/snapshot/</url>
      <snapshots><enabled>true</enabled></snapshots>
      <releases><enabled>false</enabled></releases>
    </repository>
  </repositories>
Note
Note the snapshot repository above is only required if you are using a nightly build (such as 36-SNAPSHOT)
The project was generated with a build dependencyManagement section locking down plugin versions to avoid using Maven defaults.0
<build>
    <pluginManagement><!-- lock down plugins versions to avoid using Maven defaults (may be moved to parent pom) -->
      <plugins>
        <!-- clean lifecycle, see https://maven.apache.org/ref/current/maven-core/lifecycles.html#clean_Lifecycle -->
        <plugin>
          <artifactId>maven-clean-plugin</artifactId>
          <version>3.4.0</version>
        </plugin>
        <!-- default lifecycle, jar packaging: see https://maven.apache.org/ref/current/maven-core/default-bindings.html#Plugin_bindings_for_jar_packaging -->
        <plugin>
          <artifactId>maven-resources-plugin</artifactId>
          <version>3.3.1</version>
        </plugin>
        <plugin>
          <artifactId>maven-compiler-plugin</artifactId>
          <version>3.13.0</version>
        </plugin>
        <plugin>
          <artifactId>maven-surefire-plugin</artifactId>
          <version>3.3.0</version>
        </plugin>
        <plugin>
          <artifactId>maven-jar-plugin</artifactId>
          <version>3.4.2</version>
        </plugin>
        <plugin>
          <artifactId>maven-install-plugin</artifactId>
          <version>3.1.2</version>
        </plugin>
        <plugin>
          <artifactId>maven-deploy-plugin</artifactId>
          <version>3.1.2</version>
        </plugin>
        <!-- site lifecycle, see https://maven.apache.org/ref/current/maven-core/lifecycles.html#site_Lifecycle -->
        <plugin>
          <artifactId>maven-site-plugin</artifactId>
          <version>3.12.1</version>
        </plugin>
        <plugin>
          <artifactId>maven-project-info-reports-plugin</artifactId>
          <version>3.6.1</version>
        </plugin>
      </plugins>
    </pluginManagement>
</build>
GeoTools now requires Java 17 - add build configuration to ask maven to use Java 17 source level.
    <plugins>
      <plugin>
        <groupId>org.apache.maven.plugins</groupId>
        <artifactId>maven-compiler-plugin</artifactId>
        <configuration>
          <release>17</release>
        </configuration>
      </plugin>
    </plugins>
  </build>
Here is what the completed
pom.xmllooks like:<project xmlns="http://maven.apache.org/POM/4.0.0" xmlns:xsi="http://www.w3.org/2001/XMLSchema-instance" xsi:schemaLocation="http://maven.apache.org/POM/4.0.0 https://maven.apache.org/xsd/maven-4.0.0.xsd"> <modelVersion>4.0.0</modelVersion> <groupId>org.geotools.tutorial</groupId> <artifactId>quickstart</artifactId> <version>0.0.1-SNAPSHOT</version> <packaging>jar</packaging> <name>GeoTools Quickstart</name> <url>http://maven.apache.org</url> <properties> <project.build.sourceEncoding>UTF-8</project.build.sourceEncoding> <maven.compiler.release>17</maven.compiler.release> <gt.version>36-SNAPSHOT</gt.version> <maven.deploy.skip>true</maven.deploy.skip> </properties> <dependencyManagement> <dependencies> <!-- Import the GeoTools BOM --> <dependency> <groupId>org.geotools</groupId> <artifactId>gt-bom</artifactId> <version>${gt.version}</version> <type>pom</type> <scope>import</scope> </dependency> <dependency> <groupId>org.junit</groupId> <artifactId>junit-bom</artifactId> <version>5.14.4</version> <type>pom</type> <scope>import</scope> </dependency> </dependencies> </dependencyManagement> <dependencies> <dependency> <groupId>org.geotools</groupId> <artifactId>gt-shapefile</artifactId> </dependency> <dependency> <groupId>org.geotools</groupId> <artifactId>gt-swing</artifactId> </dependency> <dependency> <groupId>org.junit.jupiter</groupId> <artifactId>junit-jupiter-api</artifactId> <scope>test</scope> </dependency> </dependencies> <repositories> <repository> <id>osgeo</id> <name>OSGeo Release Repository</name> <url>https://repo.osgeo.org/repository/release/</url> <snapshots><enabled>false</enabled></snapshots> <releases><enabled>true</enabled></releases> </repository> <repository> <id>osgeo-snapshot</id> <name>OSGeo Snapshot Repository</name> <url>https://repo.osgeo.org/repository/snapshot/</url> <snapshots><enabled>true</enabled></snapshots> <releases><enabled>false</enabled></releases> </repository> </repositories> <build> <pluginManagement><!-- lock down plugins versions to avoid using Maven defaults (may be moved to parent pom) --> <plugins> <!-- clean lifecycle, see https://maven.apache.org/ref/current/maven-core/lifecycles.html#clean_Lifecycle --> <plugin> <artifactId>maven-clean-plugin</artifactId> <version>3.4.0</version> </plugin> <!-- default lifecycle, jar packaging: see https://maven.apache.org/ref/current/maven-core/default-bindings.html#Plugin_bindings_for_jar_packaging --> <plugin> <artifactId>maven-resources-plugin</artifactId> <version>3.3.1</version> </plugin> <plugin> <artifactId>maven-compiler-plugin</artifactId> <version>3.13.0</version> </plugin> <plugin> <artifactId>maven-surefire-plugin</artifactId> <version>3.3.0</version> </plugin> <plugin> <artifactId>maven-jar-plugin</artifactId> <version>3.4.2</version> </plugin> <plugin> <artifactId>maven-install-plugin</artifactId> <version>3.1.2</version> </plugin> <plugin> <artifactId>maven-deploy-plugin</artifactId> <version>3.1.2</version> </plugin> <!-- site lifecycle, see https://maven.apache.org/ref/current/maven-core/lifecycles.html#site_Lifecycle --> <plugin> <artifactId>maven-site-plugin</artifactId> <version>3.12.1</version> </plugin> <plugin> <artifactId>maven-project-info-reports-plugin</artifactId> <version>3.6.1</version> </plugin> </plugins> </pluginManagement> <plugins> <plugin> <groupId>org.apache.maven.plugins</groupId> <artifactId>maven-compiler-plugin</artifactId> <configuration> <release>17</release> </configuration> </plugin> </plugins> </build> </project>
Recommend cutting and pasting the above to avoid mistakes when typing
You may also download
pom.xml, if this opens in your browser use Save As to save to disk.The download has an optional quality assurance profile you can safely ignore.
Return to the command line and get maven to download the required jars for your project with this command:
mvn installIf maven has trouble downloading any jar, you can always try again. A national mirror is often faster than the default maven central.
Creating the Quickstart application
Now we are ready to create the application.
Crete the org.geotools.tutorial.quickstart package by navigating to the directory
tutorialand create the directory:Linux:
src/main/java/org/geotools/tutorial/quickstartWindows:
src\main\java\org\geotools\tutorial\quickstart
In the new sub-directory, create a new file
Quickstart.javausing your text editor.Fill in the following code
Quickstart.java:/* * GeoTools Sample code and Tutorials by Open Source Geospatial Foundation, and others * https://docs.geotools.org * * To the extent possible under law, the author(s) have dedicated all copyright * and related and neighboring rights to this software to the public domain worldwide. * This software is distributed without any warranty. * * You should have received a copy of the CC0 Public Domain Dedication along with this * software. If not, see <http://creativecommons.org/publicdomain/zero/1.0/>. */ package org.geotools.tutorial.quickstart; import java.io.File; import java.util.logging.Logger; import org.geotools.api.data.FileDataStore; import org.geotools.api.data.FileDataStoreFinder; import org.geotools.api.data.SimpleFeatureSource; import org.geotools.map.FeatureLayer; import org.geotools.map.Layer; import org.geotools.map.MapContent; import org.geotools.styling.SLD; import org.geotools.api.style.Style; import org.geotools.swing.JMapFrame; import org.geotools.swing.data.JFileDataStoreChooser; /** * Prompts the user for a shapefile and displays the contents on the screen in a map frame. * * <p>This is the GeoTools Quickstart application used in documentationa and tutorials. * */ public class Quickstart { private static final Logger LOGGER = org.geotools.util.logging.Logging.getLogger(Quickstart.class); /** * GeoTools Quickstart demo application. Prompts the user for a shapefile and displays its * contents on the screen in a map frame * @param args Ignored no args required. * @throws Exception If there are errors finding the shapefile. */ public static void main(String[] args) throws Exception { // display a data store file chooser dialog for shapefiles LOGGER.info( "Quickstart"); LOGGER.config( "Welcome Developers"); LOGGER.info("java.util.logging.config.file="+System.getProperty("java.util.logging.config.file")); File file = JFileDataStoreChooser.showOpenFile("shp", null); if (file == null) { return; } LOGGER.config("File selected "+file); FileDataStore store = FileDataStoreFinder.getDataStore(file); SimpleFeatureSource featureSource = store.getFeatureSource(); // Create a map content and add our shapefile to it MapContent map = new MapContent(); map.setTitle("Quickstart"); Style style = SLD.createSimpleStyle(featureSource.getSchema()); Layer layer = new FeatureLayer(featureSource, style); map.addLayer(layer); // Now display the map JMapFrame.showMap(map); } }
You may find cutting and pasting from the documentation to be easier then typing.
You may also download
Quickstart.java
Go back to the top project directory (the one that contains your
pom.xmlfile) and build the application with the command:mvn clean install
Running the application
If you need some shapefiles to work with you will find a selection of data at the http://www.naturalearthdata.com/ project which is supported by the North American Cartographic Information Society. Head to the link below and download some cultural vectors. You can use the ‘Download all 50m cultural themes’ at top.
Unzip the above data into a location you can find easily such as the desktop.
You can run the application using Maven on the command line:
mvn exec:java -Dexec.mainClass=org.geotools.tutorial.quickstart.Quickstart
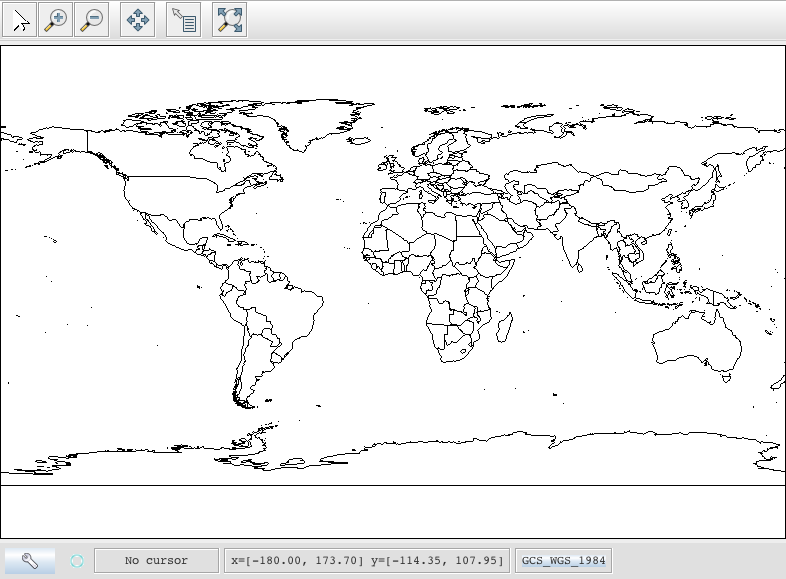
The application will connect to your shapefile, produce a map context, and display the shapefile.
A couple of things to note about the code example:
The shapefile is not loaded into memory. Instead it is read from disk each and every time it is needed. This approach allows you to work with data sets larger than available memory.
The example uses very simple display style here that just shows feature outlines. In the tutorials that follow we will see how to specify more sophisticated styles.
Things to Try
When working in a text editor instead of an IDE use the GeoTools javadocs to work out what import statements are required in your source. The javadocs also list the GeoTools module in which each class is found.
Each tutorial consists of very detailed steps followed by a series of extra questions. If you get stuck at any point please ask your instructor; or sign up to the geotools-users email list.
Here are some additional challenges for you to try:
Try out the different sample data sets.
Zoom in, zoom out and show the full extent and use the info tool to examine individual countries in the sample
countries.shpfile.Download the largest shapefile you can find and see how quickly it can be rendered. You should find that the very first time it will take a while as a spatial index is generated. After that rendering will become much faster.
Fast: We know that one of the ways people select a spatial library is based on speed. By design GeoTools does not load the above shapefile into memory (instead it streams it off of disk each time it is drawn using a spatial index to only bring the content required for display).
If you would like to ask GeoTools to cache the shapefile in memory try the following code:
    /**
     * This method demonstrates using a memory-based cache to speed up the display (e.g. when
     * zooming in and out).
     *
     * <p>There is just one line extra compared to the main method, where we create an instance of
     * CachingFeatureStore.
     * @param args Ignored no args required.
     * @throws Exception If there are errors finding the shapefile.
     */
    public static void main(String[] args) throws Exception {
        // display a data store file chooser dialog for shapefiles
        File file = JFileDataStoreChooser.showOpenFile("shp", null);
        if (file == null) {
            return;
        }

        FileDataStore store = FileDataStoreFinder.getDataStore(file);
        SimpleFeatureSource featureSource = store.getFeatureSource();
        SimpleFeatureSource cachedSource =
                DataUtilities.source(
                        new SpatialIndexFeatureCollection(featureSource.getFeatures()));

        // Create a map content and add our shapefile to it
        MapContent map = new MapContent();
        map.setTitle("Using cached features");
        Style style = SLD.createSimpleStyle(featureSource.getSchema());
        Layer layer = new FeatureLayer(cachedSource, style);
        map.addLayer(layer);

        // Now display the map
        JMapFrame.showMap(map);
    }
For the above example to compile you will need to add the necessary imports.
Note
When building you may see a message that
CachingFeatureSourceis deprecated. It’s OK to ignore it, it’s just a warning. The class is still under test but usable.
Try and sort out what all the different “side car” files are – and what they are for. The sample data set includes
shp,dbfandshx. How many other side car files are there?Advanced: The use of
FileDataStoreFinderallows us to work easily with files. The other way to do things is with a map of connection parameters. This techniques gives us a little more control over how we work with a shapefile and also allows us to connect to databases and web feature servers.File file = JFileDataStoreChooser.showOpenFile("shp", null); Map<String, Object> params = new HashMap<>(); params.put("url", file.toURI().toURL()); params.put("create spatial index", false); params.put("memory mapped buffer", false); params.put("charset", "ISO-8859-1"); DataStore store = DataStoreFinder.getDataStore(params); SimpleFeatureSource featureSource = store.getFeatureSource(store.getTypeNames()[0]);
Important: GeoTools is an active open source project – you can quickly use maven to try out the latest nightly build by changing your
pom.xmlfile to use aSNAPSHOTrelease.At the time of writing 36.x-SNAPSHOT is under active development.
<properties>
  <project.build.sourceEncoding>UTF-8</project.build.sourceEncoding>
  <geotools.version>36.x-SNAPSHOT</geotools.version>
</properties>
Double check your
pom.xmlfile to include the OSGeo snapshot repository:<repositories> <repository> <id>osgeo</id> <name>OSGeo Release Repository</name> <url>https://repo.osgeo.org/repository/release/</url> <snapshots><enabled>false</enabled></snapshots> <releases><enabled>true</enabled></releases> </repository> <repository> <id>osgeo-snapshot</id> <name>OSGeo Snapshot Repository</name> <url>https://repo.osgeo.org/repository/snapshot/</url> <snapshots><enabled>true</enabled></snapshots> <releases><enabled>false</enabled></releases> </repository> </repositories>
You can check the status of the build server producing current 36.x-SNAPSHOT here:
To force maven to download new snapshots:
mvn clean install -U
To avoid downloading any new snapshots (when offline) use:
mvn clean install -nsu
So what jars did maven actually use for the Quickstart application? Try the following on the command line:
mvn dependency:tree
We will be making use of some of the project in greater depth in the remaining tutorials.